What Makes an iPhone Photo Look Like a Real Digicam in 2026?

A believable digicam look comes from several visual cues working together: direct light when the scene calls for it, restrained dynamic range, slightly imperfect white balance, clear but not over-sharpened detail, and color that still belongs to the original moment. Grain or warmth alone cannot create that feeling. The goal is not to copy a particular sensor or physical camera, but to make an iPhone photo feel immediate, specific, and naturally imperfect.
What Actually Makes an iPhone Photo Feel Like a Digicam?
The most convincing digicam-style photos have a clear relationship between subject, light, background, and color. They do not look as if one retro effect was placed evenly over every pixel. A bright face can sit against a darker room, daylight can hold slightly cool shadows, and a small color shift can remain without turning the entire frame orange or green.This distinction matters because “digicam” is not one fixed palette. A daytime snapshot, a direct-flash night portrait, and an indoor family photo can all carry compact-digital character while looking different from one another. If you are still deciding what kind of workflow fits your camera roll, this guide to finding a digicam app that looks convincing in real photos offers a useful scene-based test.
Direct Flash Creates Separation, Not Automatic Authenticity
Direct flash can create an immediate digicam cue by making the nearest person or object bright while allowing the background to stay darker. It works best when the light has a visible purpose: revealing a face, freezing a quick gesture, or separating friends from a dim room or street.
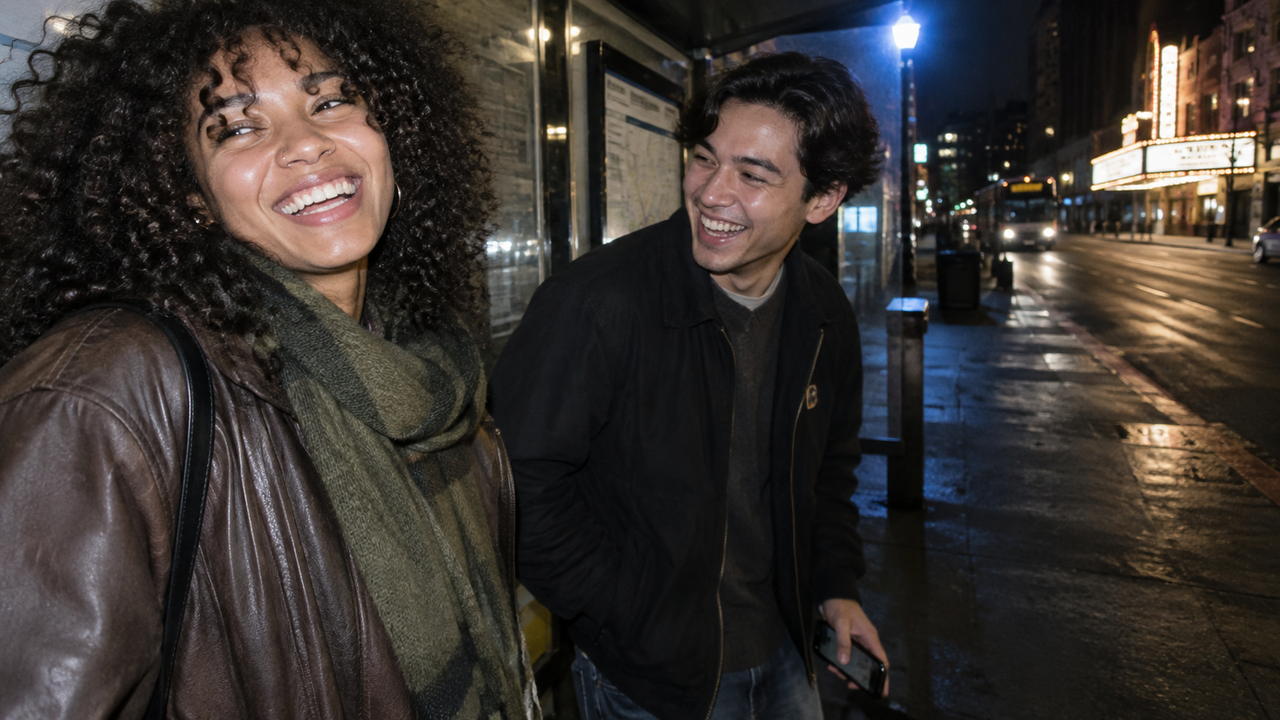
Move close enough for the flash to reach the subject, but leave a little space so skin and pale clothing do not become featureless white areas. Tap the face to focus, hold the phone steady, and take two or three frames while expressions change. If the background is important, shoot before it becomes completely dark or include a visible lamp, sign, doorway, or streetlight so the location still reads.Flash becomes unconvincing when it is treated as a complete look by itself. Heavy grain, crushed shadows, and a bright foreground cannot rescue a frame with no clear subject. Start with the moment and composition; let the flash describe the distance between the subject and the scene.
Limited Dynamic Range Should Feel Deliberate
A digicam-style image can tolerate brighter highlights and deeper shadows than a perfectly balanced phone photo, but important information should still be readable. “Limited dynamic range” does not mean intentionally destroying every bright or dark area. It means accepting that the frame may prioritize the person, sign, window, or patch of sunlight that matters most.Before shooting, decide what cannot be lost. For a portrait, protect the face. For a daytime candid, preserve the expression and the brightest clothing. For a night scene, keep enough background light to identify the place. Tap the priority subject, then lower exposure slightly if the highlights look blank. If the face is already too dark, move the person toward better light instead of planning to lift a nearly black file later.That capture-first discipline is also why a convincing look survives beyond one ideal example. WayShot's scene-by-scene guide to digicam photos uses daylight, people, travel, indoor light, and night flash as separate checks rather than assuming one treatment will behave the same everywhere.
White Balance Is More Important Than a Warm Filter
Believable digicam color usually keeps some evidence of the light that was actually present. Daylight may lean slightly cool in shade, indoor bulbs may stay warm, and a flash-lit face may look more neutral than the room behind it. These differences help the photograph feel tied to a real place.Avoid correcting every color toward the same temperature. If a night photo contains a blue streetlight and a warm doorway, let both colors remain visible unless one makes skin look unhealthy. When editing, watch neutral references such as white shirts, gray pavement, teeth, or paper. If all of them become peach, yellow, or teal, the color treatment is probably too broad.
Keep Color Relationships, Not Maximum Saturation
Strong color can suit a digicam-style photo, but the colors need a hierarchy. Skin should not compete equally with a red wall, green plant, blue sign, and orange lamp. Choose the part of the scene that should feel energetic, then check whether the subject still attracts attention at a small screen size.A quick test is to look away for a few seconds and return to the image. If your eye lands on the color cast before it finds the person or moment, reduce the treatment. The guide to adding digital-camera character to everyday iPhone photosexplains the same principle through color, tonal depth, texture, and the relationship between subject and background.
Clarity and Texture Need Restraint
A real-looking digicam image can be crisp without looking clinically sharpened. Important edges—eyes, hair, clothing seams, or lettering near the subject—should be readable, while skin, shadows, and distant detail can remain less perfect.Avoid stacking heavy sharpening, clarity, noise, and grain. That combination often produces bright halos around hair, crunchy skin, and texture that appears equally strong in the sky and on a face. Check the photograph at normal viewing size first, then zoom in only to confirm that focus and identity remain intact. A photo that works only at 300 percent is being judged like a file, not like a memory.Texture should also respond to the scene. Daylight needs less artificial roughness because clothing, hair, pavement, and foliage already provide detail. A darker flash photo can carry more visible noise, but the expression should remain clearer than the background.
Natural Imperfections Make the Moment Specific
The useful imperfections are small signs of timing and circumstance, not technical failures. Slightly uneven framing, a hand entering the edge, a hard flash shadow, or a trace of movement can make a picture feel observed rather than constructed. Severe blur, missed focus, and featureless highlights simply remove information.For candid photos, begin recording the moment before everyone settles into a pose. Keep the phone near eye level, leave a little space around moving hands, and take a short sequence rather than asking for one frozen smile. Then choose the frame with the clearest expression and strongest subject-background relationship—not necessarily the most symmetrical one.
Believable Digicam Cues vs. Over-Filtered Shortcuts
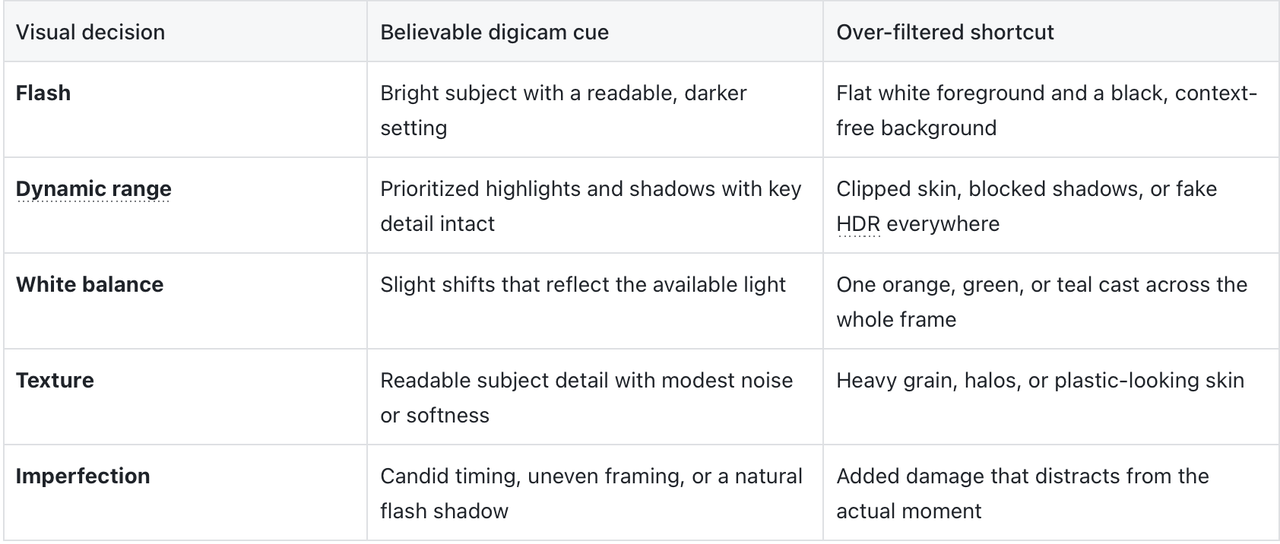
A Capture-First Workflow for Day and Night
The fastest route to a believable result is to make the major decisions before editing. For daylight, place the subject where the light has direction, protect bright skin and clothing, and avoid filling the frame with competing colors. For night, move close enough for direct light to matter, stabilize the phone, and keep one or two background cues that explain where the photo happened.Next, choose the frame before choosing the finish. Reject severe motion blur, missed focus, closed eyes, and fully clipped highlights. On the stronger frame, adjust the overall direction while repeatedly checking the face, brightest area, darkest useful detail, and dominant color. Stop when the photograph feels intentional but the original scene still makes sense.
Where WayShot Fits in This Process
WayShot is useful for iPhone photographers who want to choose a visual direction without building a long manual edit. You can select a Style while shooting, or apply a Style to a photo already in your library, as described in the official WayShot App Store listing.The important choice still happens before or around the Style: use a clear subject, believable light, and a frame with recoverable information. Compare the styled result with the original. Keep it when color, contrast, and texture strengthen the moment; reconsider it when skin becomes unfamiliar, the location disappears, or the treatment becomes the first thing you notice.WayShot is not a substitute for a physical compact camera, and a Style does not reproduce a specific CCD, sensor, lens, or camera body. It also cannot restore detail that was never recorded. Severe blur, missed focus, complete overexposure, and fully lost shadows need a better capture, not a stronger Style.
Final Check: Does the Photo Feel Captured or Applied?
A convincing digicam-style iPhone photo feels as though its character came from the moment: the direction of the light, the distance of the flash, the balance of subject and background, and the way color responded to the scene. An obvious filter feels separate from those things.Before saving, ask four questions: Is the subject still recognizable? Can I tell what kind of light was present? Does at least one background detail explain the place? Are the imperfections supporting the memory rather than covering it? If the answer is yes, the photograph does not need to imitate a specific camera to feel convincingly camera-like.
FAQ
What makes an iPhone photo look like a real digicam photo?
A convincing digicam look combines believable light, restrained dynamic range, slightly imperfect white balance, clear but not over-sharpened detail, and natural timing. Grain or a warm filter alone is not enough.
Do I need direct flash for a digicam look?
No. Direct flash is useful for close night portraits, but daylight, indoor light, and shade can also feel camera-like when color, contrast, texture, and exposure remain connected to the scene.
How much grain should a digicam-style photo have?
Use only enough texture to support the mood at normal viewing size. If grain hides facial detail, fills a clean sky, or becomes more noticeable than the subject, it is too strong.
Why does a warm vintage filter sometimes look fake?
A global warm cast can make skin, white objects, shadows, and background lights turn the same color. More natural results preserve the different color temperatures that were present in the scene.
Can WayShot apply a Style after I take the photo?
Yes. WayShot supports selecting a Style while shooting and applying a Style to a photo from the iPhone library.
Can a Style fix blur, missed focus, or blown highlights?
No. A Style can change the visual treatment, but it cannot recover severe motion blur, missed focus, completely overexposed areas, or detail that the original image never recorded.
Used Links
Guide to finding a digicam app that looks convincing in real photos https://www.wayshot.ai/blog/the-camera-like-test-how-to-find-a-digicam-app-that-looks-convincing-in-real-photos
Scene-by-scene guide to digicam photos https://www.wayshot.ai/blog/best-digicam-apps-for-real-photos-in-2026
Guide to adding digital-camera character to everyday iPhone photos https://www.wayshot.ai/blog/wayshot-gives-everyday-iphone-photos-a-more-digital-camera-look
Official WayShot App Store listing https://apps.apple.com/us/app/wayshot-aesthetic-photo-editor/id6749303003